****Updated to work with Hardy Heron releases****
If you need a quick run through on what OpenDNS can do for you, then read my post here!
This tutorial is just a more complete version of the official OpenDNS Get Started guide for Linux/Unix systems. If you need to know how to get a different type of operating system or a router using OpenDNS, then please check the official pages.
Start up a terminal & enter sudo gedit /etc/resolv.conf
Add these two lines at the top of your /etc/resolv.conf file (above any other nameserver entries you already have in there)..
nameserver 208.67.222.222
nameserver 208.67.220.220
Save the changed file & exit the text editor.
That’s pretty much it, unless you use DHCP?
If you assign your computer an IP address with DHCP, it will overwrite your /etc/resolv.conf file every time your Internet connection gets renewed. This is what you need to do to stop that from happening..
****For Dapper through to Feisty releases****
Enter sudo gedit /etc/dhcp3/dhclient.conf into your terminal & look for the following line within the text editor..
#prepend domain-name-servers
Replace that entire line of text with this one..
prepend domain-name-servers 208.67.222.222, 208.67.220.220;
Again; save the file & exit.
****For Gutsy through to Hardy releases****
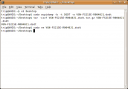
Enter the following lines into your terminal..
sudo cp /etc/resolv.conf /etc/resolv.conf.auto
Turns off auto changing of DNS srvers.
Then..
sudo gedit /etc/dhcp3/dhclient.conf
Opens the file in your text editor.
Add this line to the text file..
prepend domain-name-servers 208.67.222.222,208.67.220.220;
Save and exit the text editor.
In the terminal again enter..
sudo ifdown eth1 && sudo ifup eth1
You might need to change eth1 to whatever your network connection is configured as. This will start/restart your network connection with the new settings (or just log out and back in again).
Every time your Internet connection gets renewed now, it will always use the OpenDNS servers first. Your Internet Service Providers DNS Servers will still be used as backup in case of emergency though 🙂
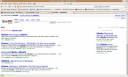
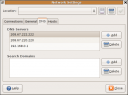
You can use Gnomes Network application to see if the changes have been applied correctly. To do this go to Gnomes System menu, navigate into the Administration sub menu & choose the Network option. Once the applications fully loaded, click the DNS tab to see what addresses your laptops set up to use.
As you can see from the screen shot below; my laptop uses the two OpenDNS addresses first & uses my routers address of 192.168.0.1 as backup. My router uses my Internet providers DNS as default..
If all looks ok in Gnomes Network application.. now would be a good time to either restart your laptop, or disconnect/reconnect your Internet connection & make sure that your changes are holding ok.
You can test that everything is working as it should by clicking on the following links within your web browser..
http://www.opendns.com/welcome/ – Clicking on this should show you the OpenDNS Welcome page.
http://www.internetbadguys.com/ – This link lets you test & make sure that OpenDNS will warn you when visiting a dodgy site.
http://system.opendns.com/ – The OpenDNS status page shows you which servers are running as they should be & if any are having trouble. I like that I can check this page for problems if my Internet seems to have slowed; Not that I’ve ever needed it 😉